How determine the correct side of the lens? Many people don’t know how to do this and often make the common mistake of putting the device on inside out. Of course, if you put the lens on the wrong side, then nothing bad will happen - the person will just feel discomfort. In this case, it must be immediately removed, washed thoroughly in a multi-purpose solution and put on correctly. Also, the device in the wrong position may not stick to the eye, but I already talked about this earlier.
- 2.1 Video: Determining the correct side of the lens
- 4.1 Video: How to put on lenses correctly
There are several ways to determine the cherished right side, we will talk about each of them today. But before that, let us remind you that before putting on the devices, you should check for cracks, tears or other visible damage, make sure they are clean and moisturized, and wash your hands thoroughly with soap.
Method one. Using inscriptions
Many lenses (such as Johnson & Johnson) have numbers or some kind of inscription on one side. In this case, you need to place the product on the tip of your finger and look carefully at this inscription. If you see several numbers (for example, “12345”, but in exactly the correct sequence), then everything is correct. And if you see a kind of mirror image of these numbers, then the product is turned inside out.
If the inscription is legible, then the side was chosen correctly
But there are also models that do not have any inscriptions. Here you need to use one of the following options.
Video: How to determine the correct side of the lenses?
How to get it
How to pull out by hand
It is important to know how to put on colored or treatment lenses for the first time. The simplest and most accessible method for removing a lens from your eye if it has rolled onto the white of the eye is to use your fingers
Algorithm of actions:
- Look up, at the same time lightly press the lens with your index finger and pull it down.
- Pull the lower eyelid towards the center of the product, grab the lens with two fingers.
- Place in a container filled with solution. Use drops.
Using drops
Using a storage and rinsing solution and simple drops, the lens can be easily “washed out of the eye.” Working technology:
- Lift the eyelid behind which the product is located using the fingers of one hand.
- With the other hand, drop as much of the solution as possible onto the cornea so that it mechanically slides to the near corner of the eye.
- Remove the product by hand and put it in a container.
Water
The method is suitable for removal in case of complications such as increased dryness and irritation. Simultaneously with the removal of the product, the entire conjunctiva is washed. Algorithm:
- Fill a container with warm boiled water so that the height from the surface is at least 5 cm.
- Lower the water so that the desired eye is completely immersed in water, blink several times.
This method is not recommended for children and hypersensitivity - it can cause discomfort and discomfort. Find out how to put on daily lenses correctly by following this link.
Special tweezers
Sometimes a special plastic tweezers are included with the storage container. The sequence of action is similar to using fingers - pull back the eyelid and remove it from the cornea using tweezers. A mirror is required to avoid damaging the sensitive tissues of the eye. Find out what to do if your eyes get dry while wearing lenses.
Tweezers are convenient to use for removal if it is not possible to thoroughly wash your hands before the procedure.
Method two. Visually, according to the shape of the product
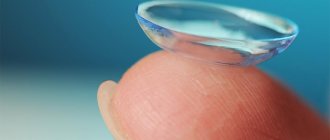
This method makes it quite easy to distinguish the back side from the front side. First, you need to remove the product from the container and place it with the concave side up on the tip of the finger with which it will be installed.
Right side
Then look carefully at the edges of the device. If it is placed correctly, the edges will be straight and raised up (forming a bowl), as shown in the image. And if it is turned inside out, the edges will be pointed and elongated.
Wrong Side
Note! For people with very poor eyesight, I recommend that before starting the putting on procedure, they carefully examine everything with glasses and determine the correct side.
And once again, to consolidate what has been learned
Video: Determining the correct side of the lens
How to distinguish right from left lenses?
So, the model recommended by the doctor has been purchased and the packaging is in front of you. What to do next? Of course, such a question may seem downright stupid to experienced users, but is it really difficult for beginners to understand how to put on contact correction products correctly? The first thing you need to do is, of course, take the optical products out of the blister. Despite the fact that this procedure seems quite simple at first glance, it often causes difficulties for new users. So, for example, if you pull the sticker covering the blister too hard, the buffer solution may spill and the lens itself may get lost. That is why ophthalmologists recommend their patients to use special tweezers. Once the optical products are in your hands, examine them as carefully as possible.
To prevent users from confusing the lenses, many manufacturers put special markings on the correction products that make it possible to distinguish which of them is intended for the right and which for the left eye.
Indications on optical products vary widely, but most manufacturers will separate the right lens from the left with the letters “L” and “R”. In the first case, optical products are intended for the left eye, in the second - for the right eye.
Method three. The correct side of the lens is the “taco” method
Another effective way to determine which side you need to put on your lenses (not on, as many say). First you need to place the device on the tip of your finger in the same way as in the previous versions.
The device fits on your finger
After this, you should gently squeeze it with your index finger and thumb to form a “taco” shape.
Then rolled into a "taco"
The product is inspected. If the edges "look" straight up, then it was placed in the correct position.
After which an inspection is carried out
If the edges are bent or rounded, the lens is inside out and needs to be corrected.
If the edges of the lens are directed upward (on the left), then it is lying right side up, and if they are rounded and curved (on the right), then the product is turned inside out
Algorithm of actions in case of error
It is possible to determine whether the lens is right or left if they are mixed in the container only if the dioptres are different. In this case, it is necessary to place the ophthalmic products on your fingers and compare the thickness. The fat one will have higher rates. However, the technique is suitable only with a large difference in diopters - from 2 to 3, which are prescribed for diseases of one eye organ.
If it is not possible to determine whether the lens is in the cells on the right or left, both should be thoroughly disinfected. It is forbidden to put it directly on the eyes. However, it is recommended to buy new ophthalmic products to avoid inflammation.
An experimental method is also effective when the lens is put on the better-seeing eye. The appearance of a feeling of discomfort, tension or blurring of the picture means that the glass is intended for the second organ of vision. To clarify the results, the procedure is repeated with another lens. The optimal duration of the test is 3-4 minutes. In case of severe discomfort that does not go away for more than 1 hour, you can drip Albucid 30% into your eyes.
Some good advice
- Does it make a difference which way you put the lenses on? Of course there is! Therefore, everything needs to be done correctly.
- When turning the product over, do not use your nails, as the material is very fragile and can be scratched.
- Before each procedure, you should thoroughly wash your hands, because even small particles of dirt that get under the lenses can cause serious problems.
- Colored models are colorless around the circumference, a slight blue or green tint is noticeable only near the very edges. If it is not noticeable, then the device is most likely turned inside out.
What happens if you mix up the lenses?
Numerous studies by specialists in the field of optometry and contactology have shown that in most people the eyeballs are absolutely identical in curvature. However, it may also be that there are still some, albeit minor, differences. What to do if the lenses are still mixed up? As you probably already know, contact lenses take the shape of the cornea. Initially there may be a feeling of discomfort. In addition, experts have found that our organs of vision may have different microflora. What will happen in such a situation? Incorrect application can lead to irritation, redness, burning and itching.
Problems can only arise if the contact lenses you use have different diopters and the difference is quite significant.
This is very simple to understand - you will noticeably see objects worse. In this case, it is quite easy to identify what happened. You can remove the optical products from your eyes and swap them around yourself. If you still experience discomfort after the change, we recommend that you consult an ophthalmologist.
How to properly remove eye lenses for the first time
Removing eye lenses is a little more difficult than putting them on:
- Just as during the putting on process, you can remove eye lenses only after washing your hands with an antibacterial liquid.
- You need to take off the one you put on first.
- Look at the ceiling and pull down your lower eyelid.
- Using the index finger of your other hand, slowly touch the bottom of the lens.
- Move the lens to the side, below the pupil, onto the sclera area.
- Gently squeeze the correction product between your thumb and forefinger and remove it.
- Do the same with the second one.
You can learn how to properly remove your lenses for the first time from the video instructions below.
Preparing for the donning process
Careful preparation is required. You will need: a mirror, a container, a special solution for treatment, moisturizing drops.
Before the procedure, wash your hands with soap. Thoroughly rinse the soap from your hands if it gets into your eyes, it causes discomfort.
Dry your hands with a paper towel to remove any lint. Small fluff is almost invisible to the naked eye, but can cause discomfort if it gets into the eye or optics when put on. Ideally, allow your hands to dry naturally.
If you don’t know how to put lenses on your eyes for the first time, it’s best to cut your nails short; without experience, you can tear or scratch the lens, or accidentally injure your organs of vision.
When removing, all manipulations should be repeated.
What are the dangers of wearing lenses incorrectly?
- The cornea swells.
Most often, a complication occurs if a person wears unsuitable lenses and constantly sleeps in them. For the swelling to go away, you need to stop using lenses. - Protein deposits
lead to eye infection and significantly damage the cornea. - Papillary
is characterized by the appearance of papillae on the mucous membrane of the eyes. - for different cleaning solutions, hard lenses.
- Contact lens intolerance
manifests itself in the form of severe eye irritation, severe itching, and foreign body sensation.
Attention! In case of infection, you must urgently stop wearing lenses, consult an ophthalmologist, he will prescribe drops and medications that will help relieve pain, relieve burning and itching in the eyes.
So, it is very important to follow all the rules for using lenses. If you wear lenses incorrectly, serious eye problems can occur. If an infection or other unpleasant sensations occur, immediately consult a doctor, he will definitely help you.
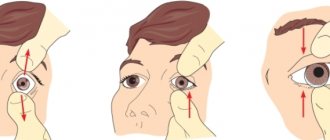
Before putting on contact lenses, be sure to wash your hands with soap and running water. Dry your hands with a lint-free towel or simply dry them. Remember that keeping your hands clean and hygienic is important to wearing contact lenses safely.
To avoid getting your contact lenses mixed up, develop the habit of always starting the lens placement on your right eye. Try to adhere to the following sequence of operations:
| Place the lens on the pad of the index finger of your right hand, making sure that the lens is not turned inside out. Also make sure the lens is clean and undamaged. | right wrong |
| Pull down the lower eyelid with the middle finger of the same hand. Lift your eyes up and carefully place the lens on the white part of the eye below the pupil. Remove your index finger from the contact lens. Keep your eyes down for precise centering of the lens. | |
| Gently release the retracted lower eyelid. Close your eyes briefly for better lens fit. The criterion for a normal fit is increased visual acuity. |
Repeat the above operations with the other lens.
There are other ways to insert contact lenses. If the method described above is difficult for you, your ophthalmologist will recommend another method.
Aligning Contact Lenses
Typically, lenses are automatically positioned in the middle of the cornea at the time of installation and very rarely move towards the sclera during wear. This, however, can happen if contact lenses are not inserted or removed correctly. To center the lenses, do one of the following:
- Close your eyelids and gently move the lens into place using massaging movements through your closed eyelids.
- Carefully move the displaced lens back to the middle of the cornea with the eyelids open, pressing with your finger on the edge of the upper or lower eyelid.
ATTENTION!!! If you see blurred after getting contact lenses, this may be due to the following reasons:
- The lens is not positioned in the center of the cornea. In this case, follow the instructions above.
- If the lens is in the correct position, remove it and check whether the following points occur: the lens is dirty (for example, with cosmetics), the lens is installed on the wrong eye, the lens is turned outward.
Removing contact lenses
Always remove the lens you started with first.
Before removing your lens, wash your hands thoroughly and practice good hygiene.
ATTENTION!!! First, make sure that the lens is on the cornea, and only then proceed to remove it.
The lenses may feel slightly dry and sticky after wearing. When removing contact lenses, make sure that the edges do not curl and that the lenses themselves do not stick to each other. If this happens, do not try to separate them. Place the lenses in a multifunctional solution and they will straighten themselves once saturated with water. Try not to pinch your contact lenses with your fingernails as if you were using tweezers.
Wearing soft contact lenses
When you start using contact lenses, during the first two to four weeks (depending on the type of lenses) your eyes will get used to the contact lenses. During this time, the eye adapts to the “foreign” body, and tear production changes.
To make the adjustment period faster and almost unnoticeable, you can use special drops. In the first days, you should not wear lenses from morning to evening: gradually increase the wearing time, following the doctor’s recommendations. You should never leave your lenses in overnight unless they are a new type of contact lens, PureVision silicone hydrogel lenses, but even then you must follow your doctor's instructions.
The tolerance of soft contact lenses is affected by your health status, some chronic diseases, medications, etc. Do not wear soft contact lenses (but use glasses) if you have a cold (flu, acute respiratory infection, sore throat) or inflammatory eye disease (conjunctivitis, blepharitis, etc.). If you visit the pool, be sure to use swimming goggles. If water from a pool or other body of water (river, sea) gets into your eyes, remove your soft contact lenses, rinse them in the solution, and then put them back on.
Remember, if you want to use contact correction for a long time and without any problems, then visit your doctor every 6 months!
You should contact your doctor immediately if you experience the following symptoms:
When these symptoms appear, it is necessary to remove contact lenses and examine them for the presence of foreign bodies, dirt, or damage. If the lenses have no visible defects, clean them, rinse them and put them back on. If adverse symptoms persist after this, see a doctor immediately, who will determine the need for further treatment.
Putting on and taking off contact lenses for your eyes is quite simple. Having done this for the first time, you will immediately understand how mistaken you were in thinking through the complexities of this process. Of course, beginners will need a little time to get used to it and get better at it, but very soon this action will not take you extra minutes or even thoughts, since it will take place purely automatically
Continued wearing of contact lenses
When using lenses, the following rules must be observed:
- remove before going to bed;
- select according to an ophthalmologist's prescription;
- do not use them if there are contraindications;
- do not use for conjunctivitis, active lacrimation, infections and eye injuries;
- for chronic blepharitis and dry eye syndrome, use one-day products or frequently clean and disinfect multi-day products;
- store in a special container with lens solution, which must be changed daily, and the container must be changed at least once every 3 months;
- do not use water, alcohol or other liquids not suitable for cleaning;
- remove before visiting the pool, bathhouse, sauna, taking a shower or bath;
- do not use products and solutions that have expired;
- if vision is blurred, drop artificial tear preparations onto the cornea, and if the symptom persists for 10-15 minutes, then reduce the wearing time.
After removing the lens, place it on a clean, dry palm, moisten it with cleaning liquid, and rub gently with a fingertip. Once a week, immerse the products in an enzyme solution, which removes organic deposits and restores the transparency of the material.
It is recommended to get used to corrective overlays gradually. On the first day, you can replace your glasses with them for an hour. Then increase the duration of wear by 30 minutes every day. The wearing limit is 10-12 hours.
There are several types of lenses on the market:
- one-day;
- weekly;
- menstruation, etc.
The duration of wear is determined by the gas permeability of the hydrogel or polymer layer.
Most products should be removed daily, providing the eyes with rest and unlimited access to oxygen. The only exceptions are pads with flexible and prolonged replacement modes: they can not be removed for several days.
When working in dusty and hazardous industries (cleaning, painting, drilling), the service life of the product is reduced. If it is constantly felt on the cornea, then you need to buy a new one, regardless of the service life.
How to remove lenses correctly?
You can use a more complex method or the pinch method. If you decide to remove the lenses using the first method, then follow these steps:
- Pull back the bottom of the eyelid with your middle finger.
- Look up without raising your head.
- Using the tip of your index finger, touch the lens and gently move it to the inner corner of your eye.
- Squeeze the lens between your thumb and index finger, then carefully remove it.
- Place the lenses in a special container with fresh solution.
What is the pinch method?
Using this method you will avoid scratches and injuries to the cornea. This method allows you to quickly and conveniently remove the lens:
- Tilt your head forward in front of the mirror and look up.
- Using your index finger, slide the lens down along the sclera.
- Using your thumb and index finger, squeeze the lens.
- Remove the lens.
To avoid harm to your eyes, it is important to wear your lenses safely. To do this, follow these general rules:
- Buy a solution that suits your lenses.
- Avoid wearing lenses during hormonal therapy, taking antibacterial agents, or if you have eye inflammation.
- Don't swim in your lenses.
- When placing lenses in a container, carefully check that they are completely immersed in the solution.
- Change the container when you buy a new lens.
- Do not forget about the lens wearing regime. If you have hydrogel lenses, wear them for no more than 12 hours, and remember to remove them before going to bed. But silicone hydrogel can be worn for longer; it can be left on even overnight.
- Do not wash the lens under the tap.
- The contact lens can be put on only before applying makeup, and removed after washing with a special tonic for removing makeup.
- You cannot use other people's lenses, they can lead to...
It is worth noting that modern contact lenses are characterized by high oxygen permeability, so they are convenient and comfortable to wear. You cannot prescribe lenses for yourself; this must be done by an ophthalmologist. He will introduce you and advise you on lens care.
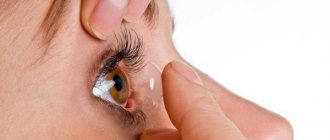
How to properly put on and position the lens in the eye
An ophthalmologist should demonstrate how to properly put on lenses for the first time. Professional help will help avoid panic, track mistakes, and differentiate the pathological reaction of the mucous membrane.
When first used, there is always a feeling of discomfort, a sensation of a foreign object in the eye. But if painful, cutting sensations appear, you need to remove the product and put it on again.
Manual method
You can choose which eye to install the patch on first based on the position of your dominant hand, the ratio of visual clarity (if there is a strong difference), or other considerations.
How to put on shapewear:
- Wash and dry your hands thoroughly. If you don’t have access to water, you can use antibacterial wipes and water-based antiseptic gel. In addition, it is advisable to use soap with a neutral pH, because... it reduces the risk of corneal irritation.
- Sit in front of a mirror, take the lens out of the container. Process it additionally, incl. upon first use, not required. To avoid damage, you need to pick it up with tweezers with soft silicone tips. Do not use fingers or nails for extraction.
- Place it on your index finger.
- Relax your facial muscles, open your eyes wide, look up.
- Without pressing on the cornea, place the pad just below the center of the pupil. Slowly close your eyes and blink. If necessary, lightly massage the eyeballs through the eyelids to correct the position.
- Repeat the procedure with the second product.
- If the lens has moved under the eyelid, you need to take it out, rinse it in a container, and repeat the putting procedure on. Severe displacement can cause irritation and pain. When these symptoms appear, you need to apply a moisturizer. You should try again no earlier than after a few hours.
- If the product falls, you need to wash it with a disinfectant solution. You can continue putting it on immediately after treatment.
You need to act confidently and consistently.
To reduce discomfort when first putting it on, it is necessary to prepare the nerve endings of the cornea in advance. To do this, you need to close your eye, hold the drooping eyelid with the fingers of one hand, and then touch the cornea through it. To get used to it, you need to carry out this procedure several times a day for 2-3 days before the first use of the medical device.
Use of special equipment
Some people find it easier to apply the pads using a special suction cup. It has a concave surface that is convenient for gripping optical products, and a small handle that provides compression.
It is convenient to use a suction cup tool.
How to put on and remove contact lenses using special equipment:
- wash your hands, inspect the surface of the object;
- remove the suction cup from the container, rinse with a disinfectant solution;
- place the correction pad on the fingers with the convex side up;
- with the other hand, grab the rod of the suction cup, squeeze its edge (pneumatic bulb);
- holding the bulb, apply the tool to the optical product and release the compression so that the surfaces are attracted;
- check the correct location of the lens, apply it to the cornea, slightly spreading the eyelids;
- Squeeze the bulb again so that the medical device pushes off the suction cup and sticks to the mucous membrane;
- slowly lower your eyelids, blink, install the second pad;
- To remove the lenses, you need to drop a moisturizing drug into your eyes, blink several times, and perform the procedure in reverse order.
The instrument must be brought perpendicular to the eye. Changing the angle causes the item to be placed incorrectly.
The suction cup should be stored in a clean plastic container and regularly treated with antiseptics.